 B2BROKER
 B2CORE
 B2CORE IB
 B2TRADER
 B2CONNECT

 B2TRANSLATE
 B2BROKER
How to integrate Stripe
Learn how to integrate Stripe with B2CORE via PSS for deposits in supported currencies through the Stripe-hosted checkout page, including setting up connections, adding methods, and configuring webhooks
Stripe can be connected to B2CORE through PSS, with support for deposits processed in EUR, GBP, and USD. Clients are redirected to the Stripe-hosted Checkout page to complete the payment.
Follow the instructions below to configure the Stripe connection, set up the deposit method in the B2CORE Back Office, and register webhooks in Stripe. These instructions correspond to the General procedure for adding methods for PSS-supported payment systems, but include details specific to Stripe.
Before proceeding with the instructions, you must have signed up for Stripe and have an active account. You can consult the official Stripe documentation or contact their support in case you have any questions.
Configure a connection to Stripe
To configure a connection to Stripe for making deposits:
In the B2CORE Back Office, navigate to System > External connections.
Click +Create in the upper-right page corner.
On the Create connection page, fill in the following fields:
- In the Name field, enter a name for the connection. The name must be unique and may only contain Latin letters, numbers, dashes, and underscores (for example,
Deposits_Stripe). - In the Caption field, enter a caption that will be applied to the connection in the Back Office.
- In the Provider dropdown, select PaymentSystemDeposit.
In the Driver dropdown that appears, select Stripe.
In the Credentials section that appears, configure the Stripe-specific settings:
- In the API base URL field, keep the default value
https://api.stripe.com. The same URL is used for both the live and the test environment. - In the Secret key field, enter the secret or restricted API key generated in your Stripe account. The environment is determined by the key: use a live key for production and a test key for testing.
To get the key, sign in to the Stripe Dashboard and navigate to Developers > API keys (for details, refer to API keys).
If you use a restricted key, make sure it has the Read permission for Balance and the Write permission for Checkout Sessions. The configuration test only verifies the Balance permission.
Click Save to create the connection.
The Stripe connection will appear in the list of external connections.
Check the connection status.
If the connection is inactive (No is displayed in the Enabled column), click the Edit button to open the connection details and set the Enabled dropdown to Yes.
Click Save to apply the changes.
Add a deposit method through Stripe
To add and set up a method for making deposits through Stripe:
In the B2CORE Back Office, navigate to System > Deposit system > Deposit methods.
Click +Create in the upper-right page corner.
On the Create a deposit method page, fill in the following fields:
- In the Name field, enter a name for the method. The name must be unique and may only contain Latin letters, numbers, dashes, and underscores.
- In the Caption field, enter a caption for the method. This caption will be assigned to the method in the Back Office and will be visible to clients in the B2CORE UI.
- In the Provider dropdown, select PaymentSystemDeposit.
After selecting PaymentSystemDeposit, the following fields appear:
- In the Available account currencies dropdown, select one or more currencies. Deposits through Stripe will be available to accounts denominated in the selected currencies.
- In the Driver dropdown, select Stripe.
- In the Connection dropdown, select the previously configured Stripe connection.
Click Save to create the deposit method.
The Stripe deposit method will appear in the list of deposit methods.
Click Edit to enter the method details and complete the following fields:
-
On the Settings tab, use the Group dropdown to select one or more groups where the method should be included.
-
In the Icon field, specify
paymethod-stripeto display the predefined icon for the Stripe deposit method in the B2CORE UI. To use a custom icon, specify the URL of the image to be displayed. -
Check the method status.
If the method is inactive (No is displayed in the Enabled field), activate it by setting the Enabled dropdown to Yes.
-
On the PS Currencies tab, add the needed currencies, such as
EUR,GBP, andUSD. Deposits through Stripe will be processed in the currencies added on this tab (for the tab description, refer to Deposit methods). -
If needed, configure commissions for the method on the Commissions tab (for details, refer to How to configure commissions for deposit and withdrawal methods).
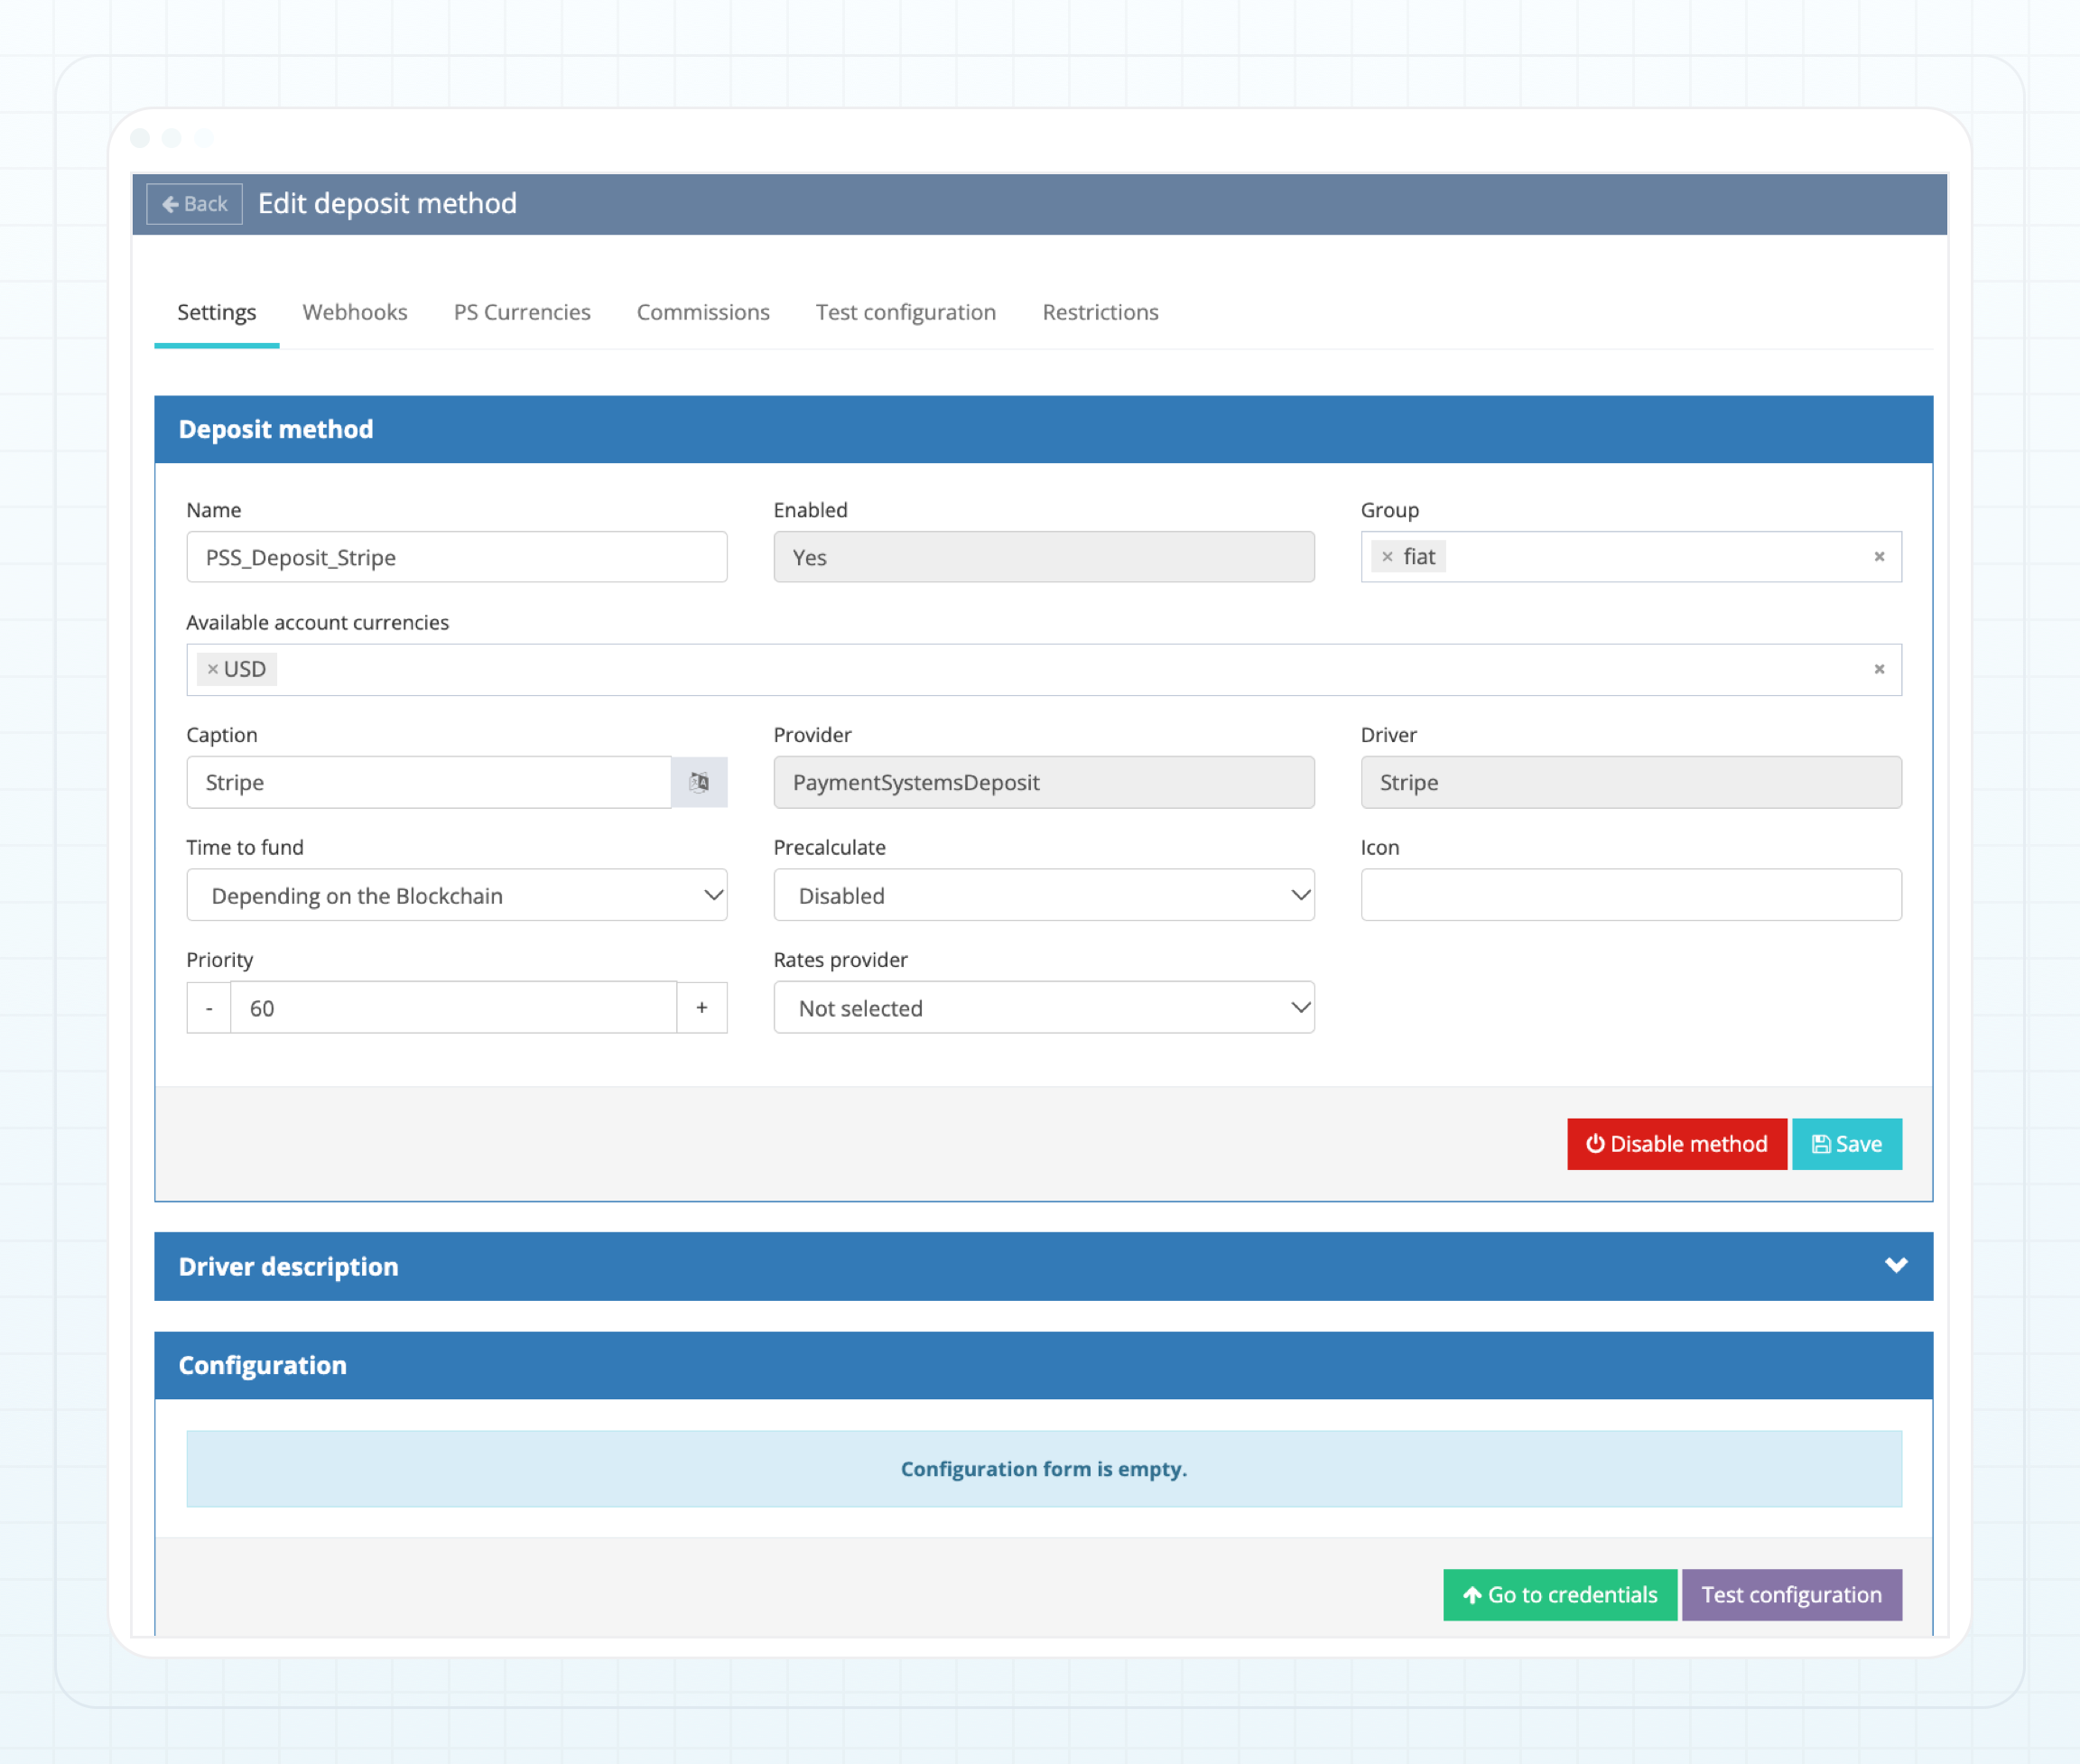
Click Test configuration to validate the connection settings of the deposit method. The test is performed based on the settings specified in the method form and the data provided in the selected external connection.
The test result will be displayed on the page.
After successfully validating the configuration, click Save.
The Stripe deposit method is now configured in the B2CORE Back Office.
Limitations
The Stripe deposit method has no built-in minimum and maximum amount checks. Configure the amount limits for the method in B2CORE to match the requirements of Stripe.
Set up webhooks in Stripe
To receive status updates for initiated deposits in B2CORE, you need to create an event destination with a webhook endpoint in the Stripe Dashboard.
Copy the webhook URL from the B2CORE Back Office
In the B2CORE Back Office, navigate to System > Deposit system > Deposit methods.
Find the configured Stripe deposit method and click Edit to enter the method details.
Go to the Webhooks tab.
Copy the URL displayed in the Notification URL field.
Create an event destination in Stripe
Sign in to the Stripe Dashboard, navigate to Developers > Webhooks, and start creating a new event destination.
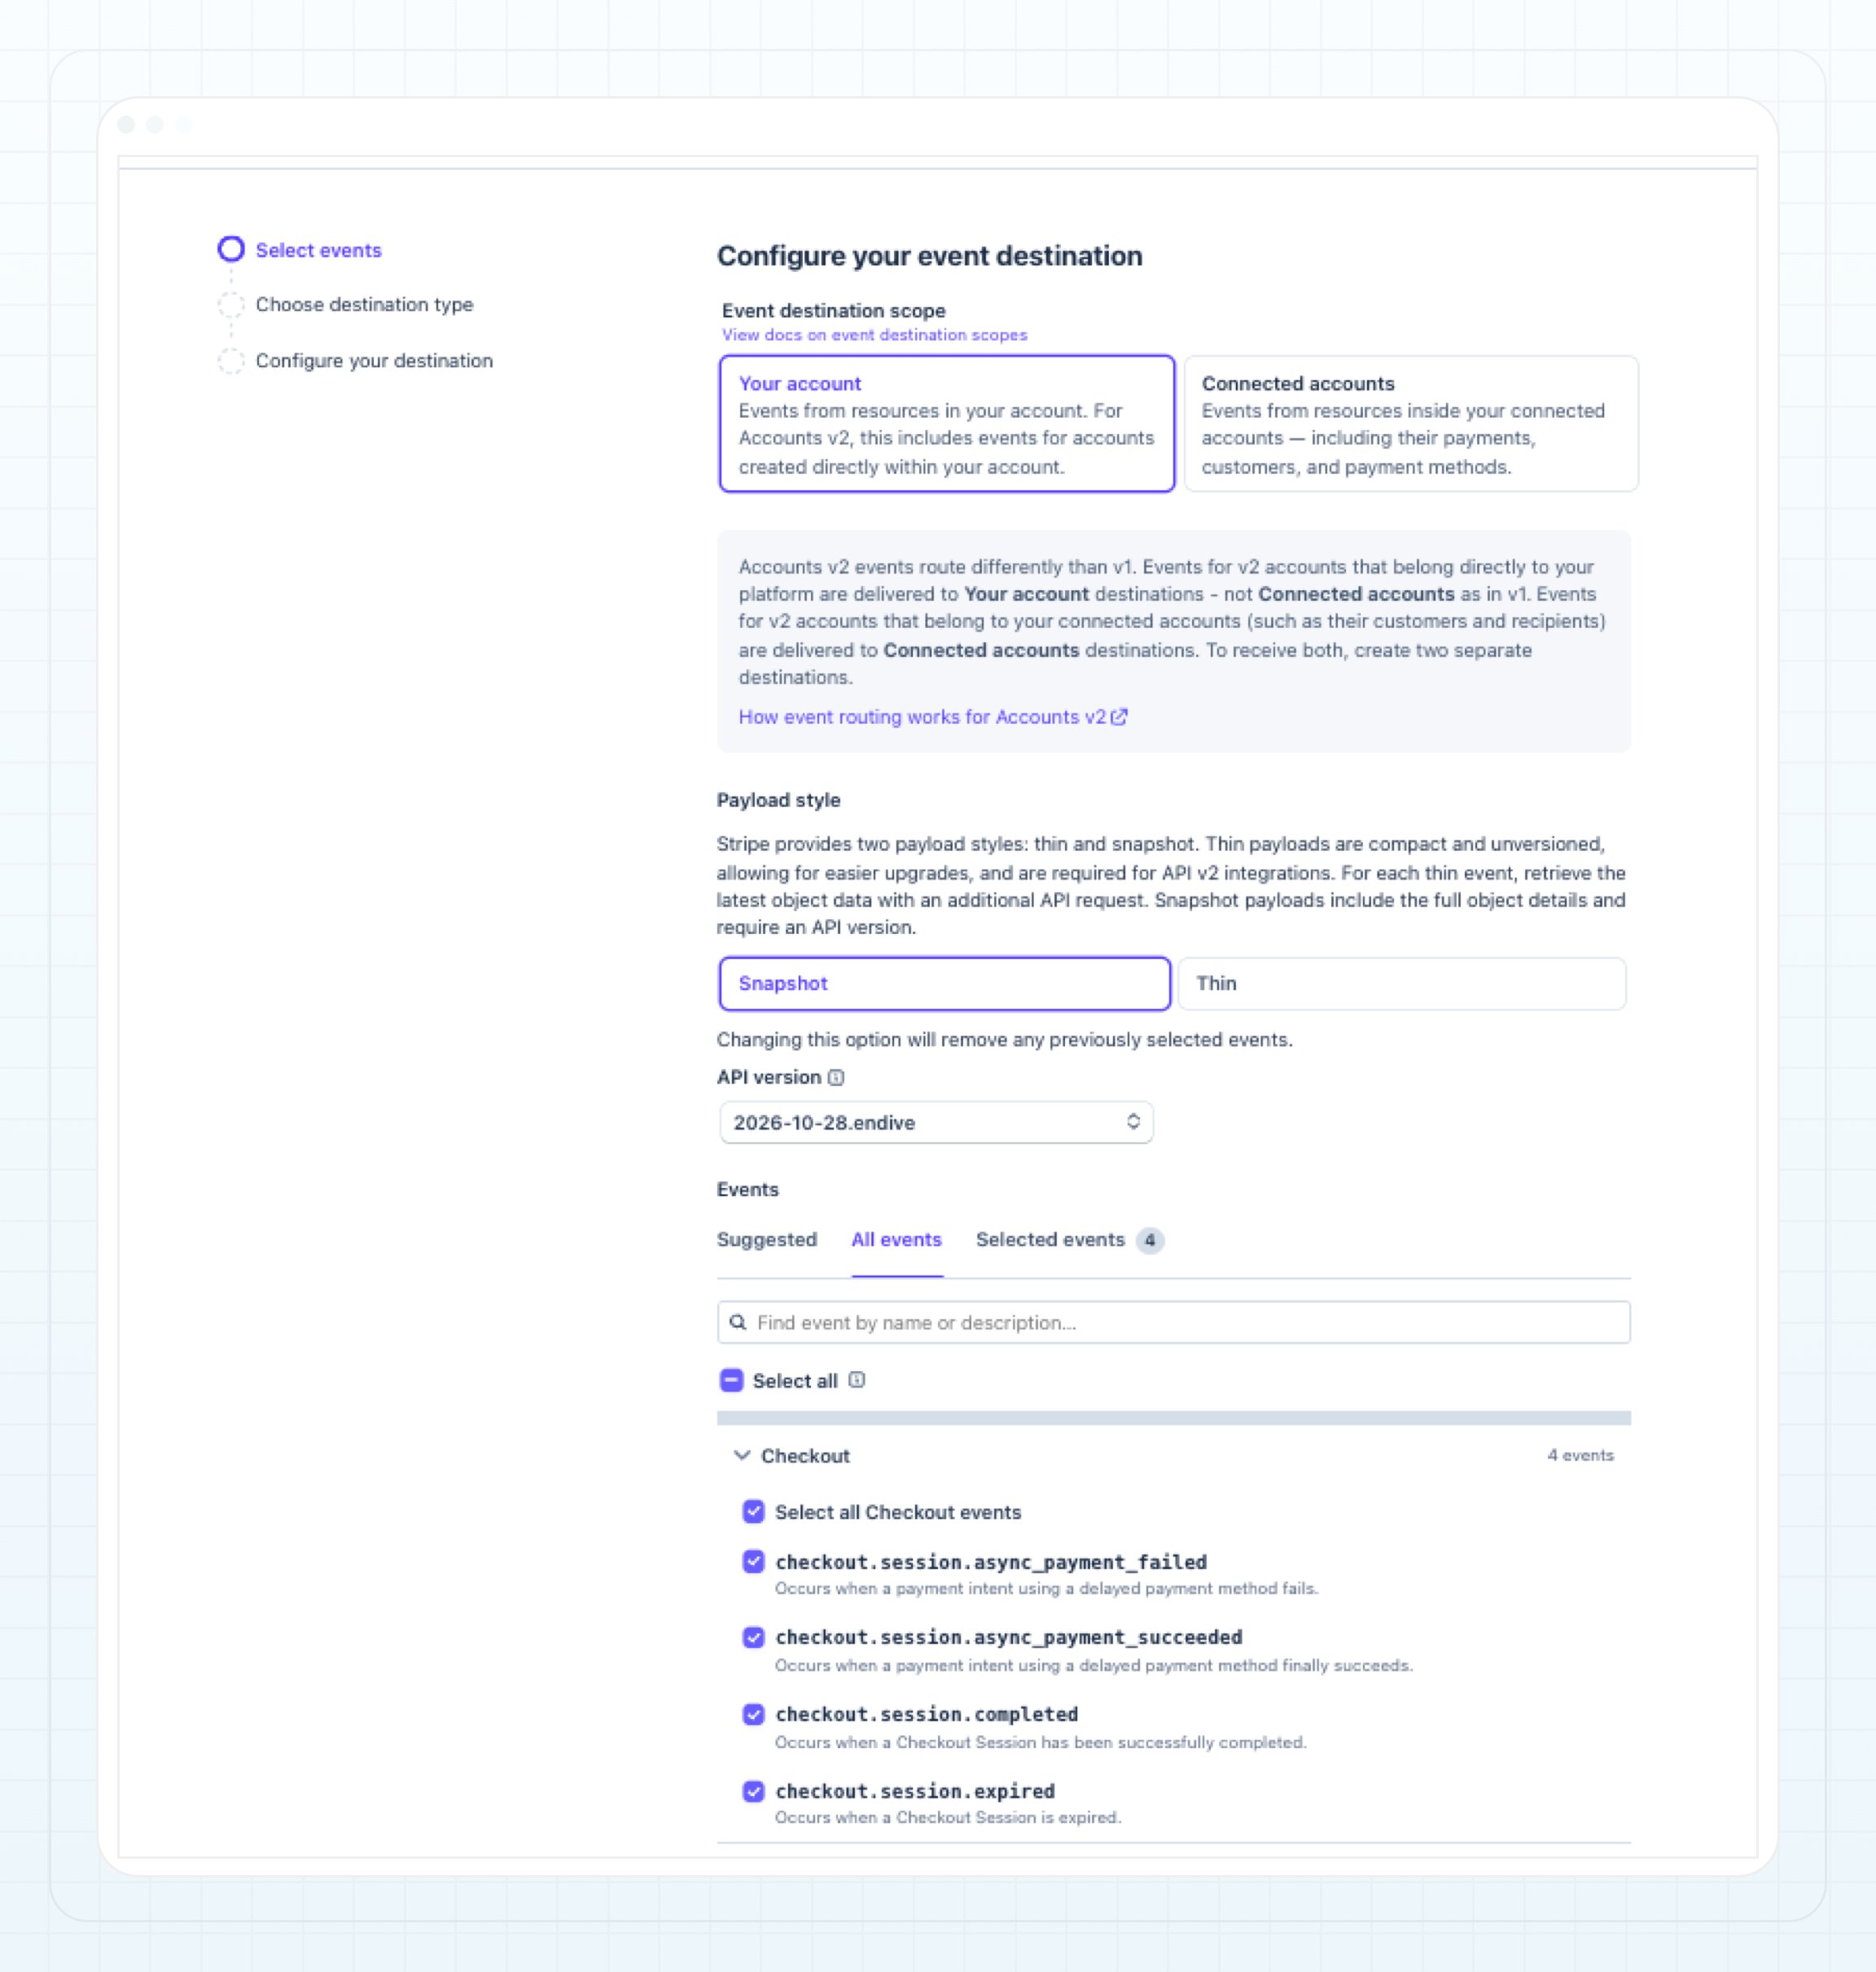
On the Select events step, configure the following settings:
-
Under Event destination scope, select Your account.
-
Under Payload style, select Snapshot. B2CORE reads the Checkout Session ID from the event payload, which thin payloads do not include.
-
Under Events, select the following events (they are listed in the Checkout group):
checkout.session.completedcheckout.session.async_payment_succeededcheckout.session.async_payment_failedcheckout.session.expired
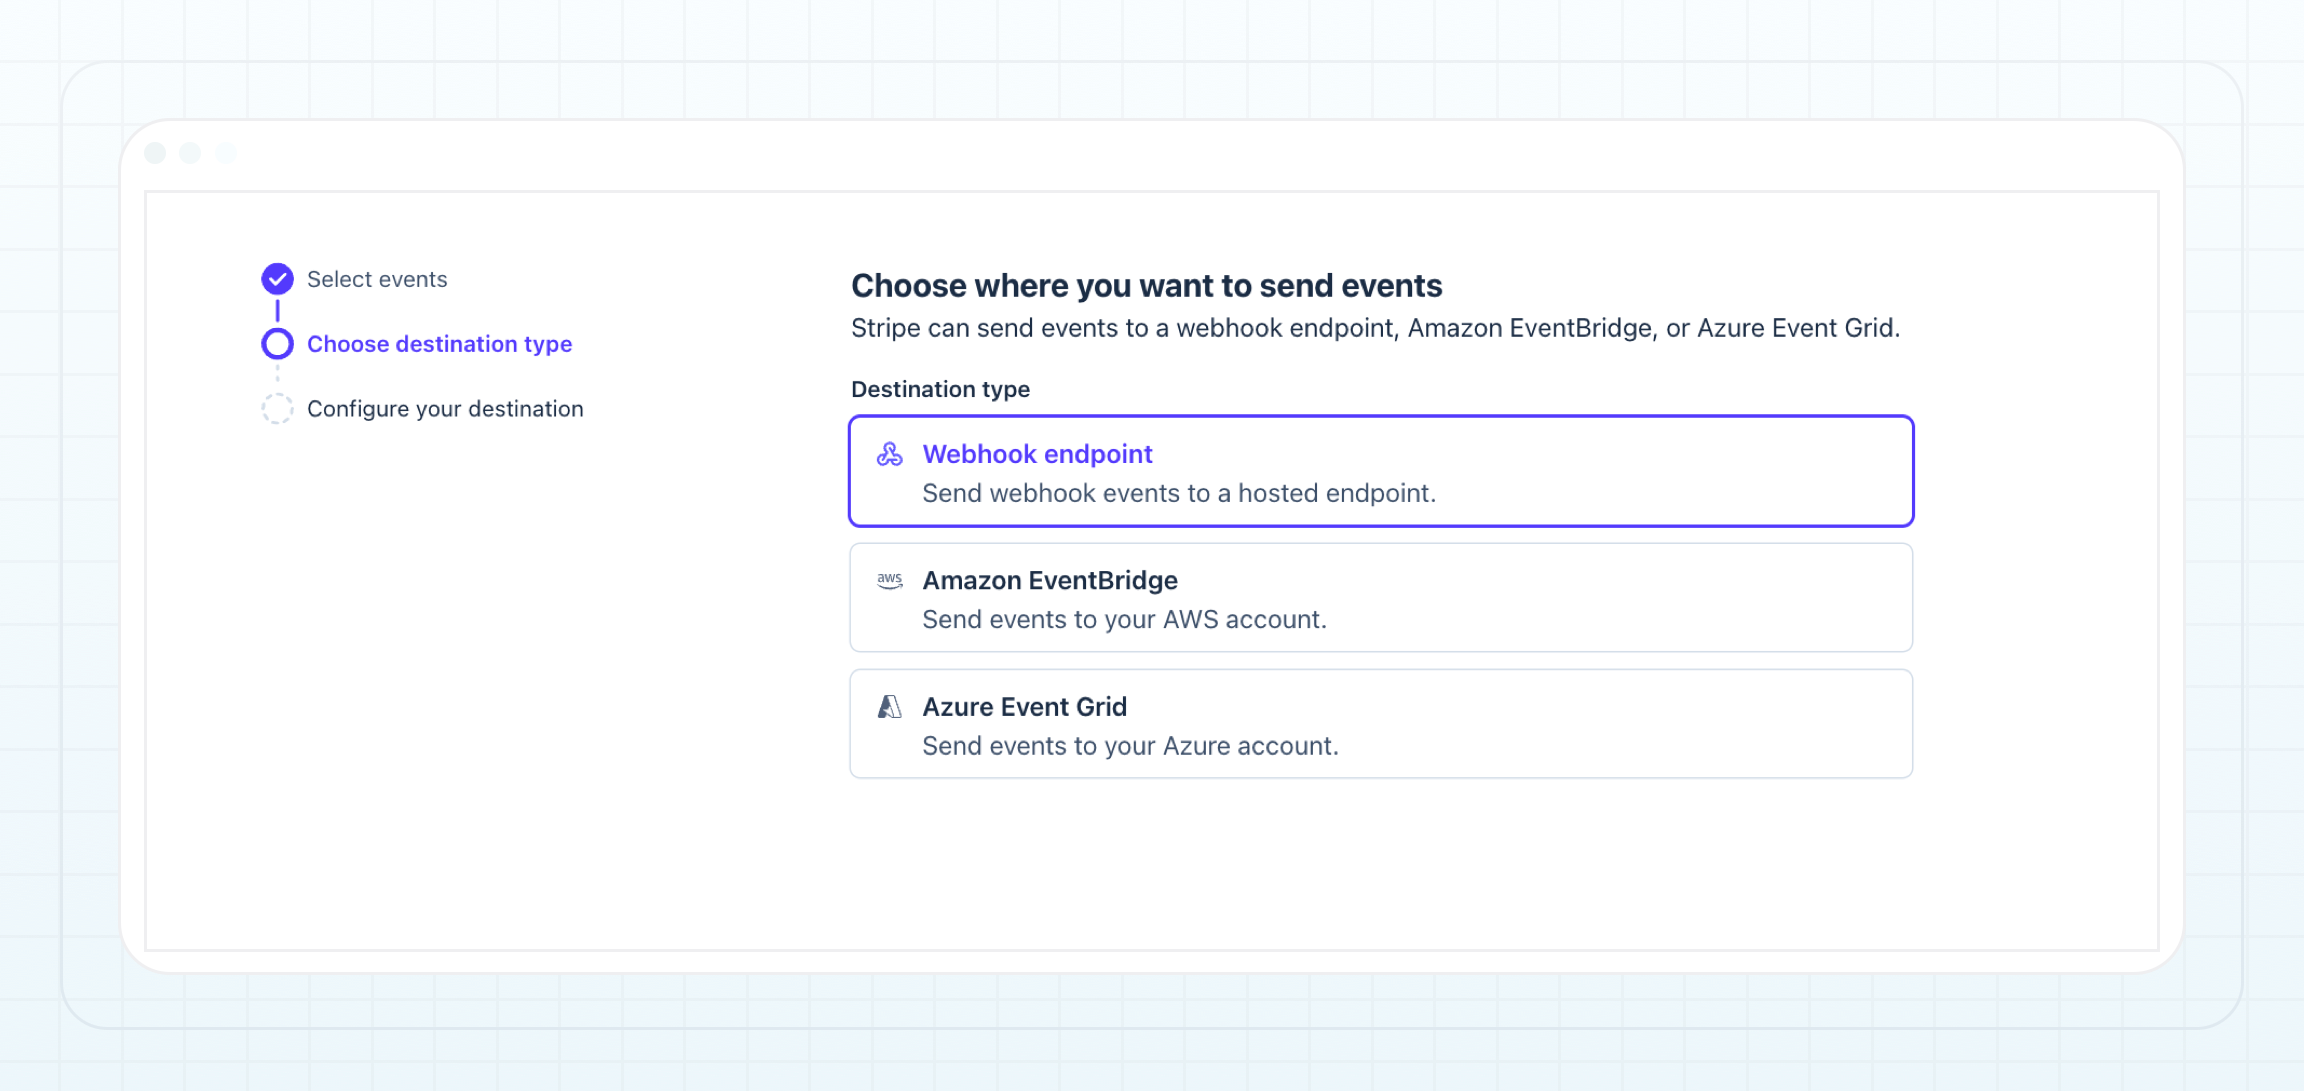
On the Choose destination type step, select Webhook endpoint.
On the Configure your destination step, fill in the following fields:
- In the Destination name field, enter a name for the destination or keep the generated one.
- In the Endpoint URL field, paste the webhook URL copied from the B2CORE Back Office.
- If needed, add a Description of the destination.
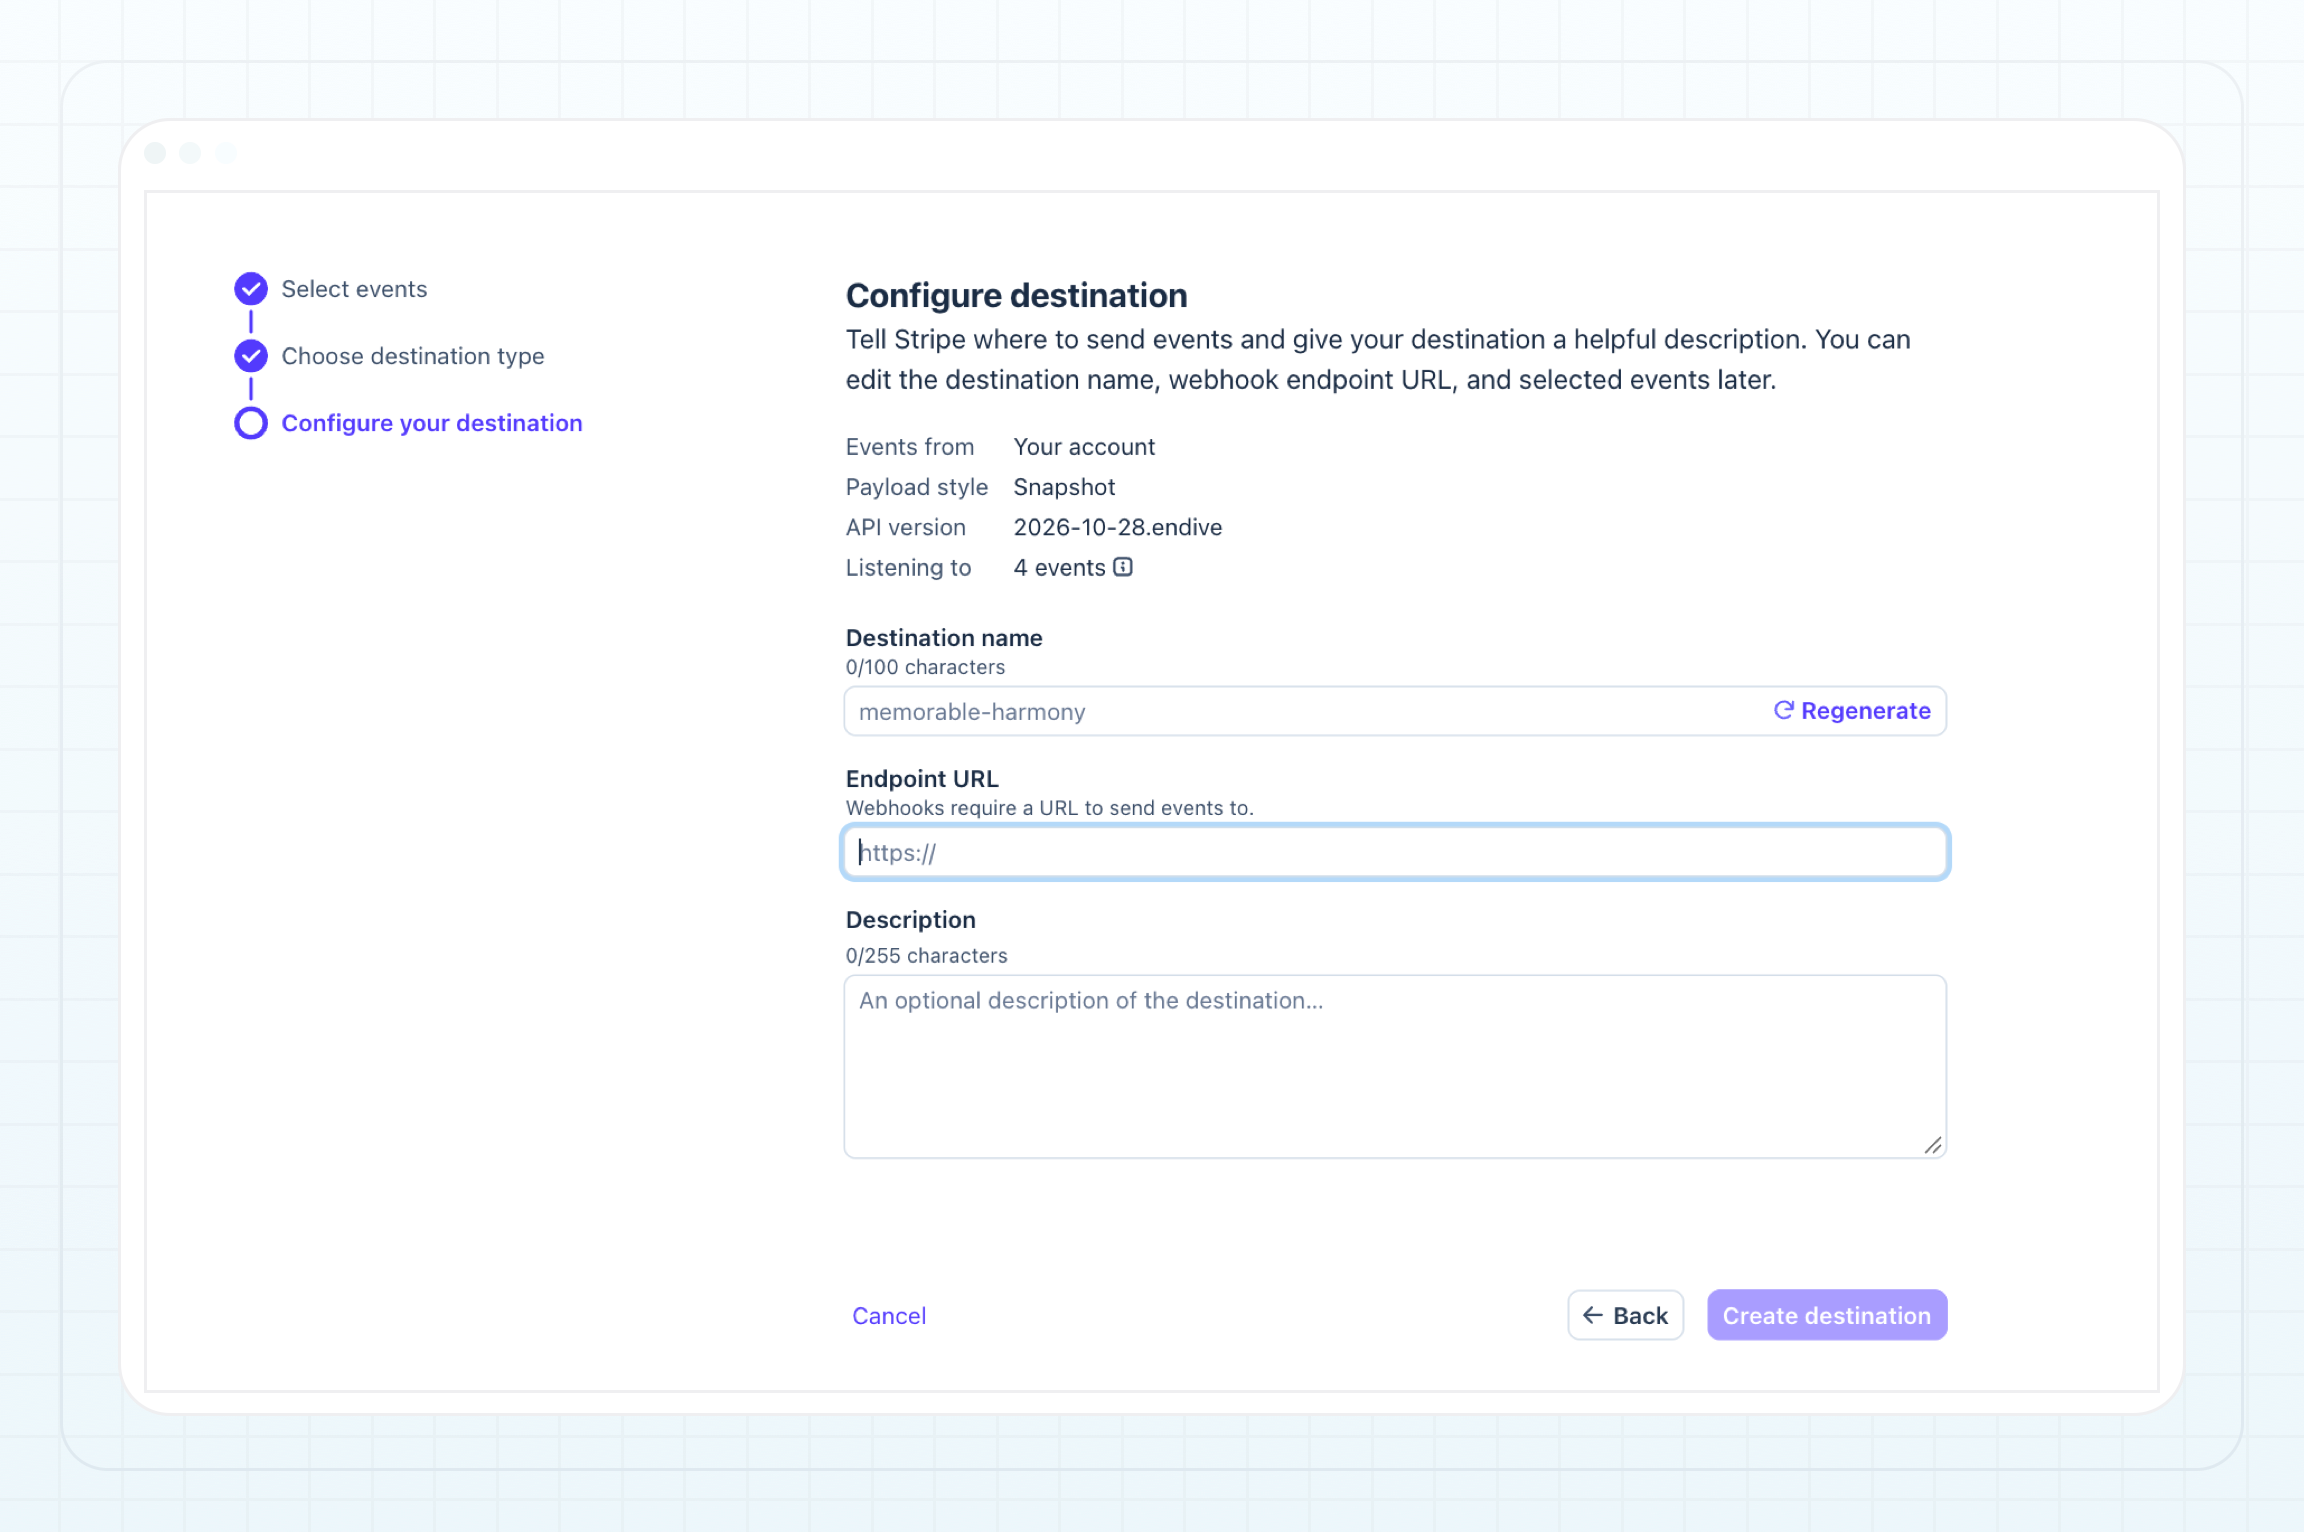
Click Create destination.
For details on event destinations, refer to the Stripe documentation.
Last updated on